In this article
- Tables and Columns in a Database Diagram
- Relationships in a Database Diagram
- In this Section
- See Also
Applies to: SQL Server
Azure SQL Database
Azure SQL Managed Instance
Analytics Platform System (PDW)
The Database Designer is a visual tool that allows you to design and visualize a database to which you are connected. When designing a database, you can use Database Designer to create, edit, or delete tables, columns, keys, indexes, relationships, and constraints. To visualize a database, you can create one or more diagrams illustrating some or all of the tables, columns, keys, and relationships in it.
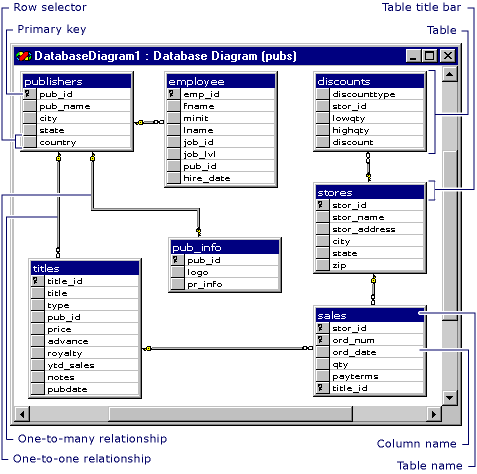
For any database, you can create as many database diagrams as you like; each database table can appear on any number of diagrams. Thus, you can create different diagrams to visualize different portions of the database, or to accentuate different aspects of the design. For example, you can create a large diagram showing all tables and columns, and you can create a smaller diagram showing all tables without showing the columns.
Each database diagram you create is stored in the associated database.
Tables and Columns in a Database Diagram
Within a database diagram, each table can appear with three distinct features: a title bar, a row selector, and a set of property columns.
Title Bar The title bar shows the name of the table
If you have modified a table and have not yet saved it, an asterisk (*) appears at the end of the table name to indicate unsaved changes. For information about saving modified tables and diagrams, see Work with Database Diagrams (Visual Database Tools)
Row Selector You can click the row selector to select a database column in the table. The row selector displays a key symbol if the column is in the table’s primary key. For information about primary keys, see Working with Keys.
Property Columns The set of property columns is visible only in the certain views of your table. You can view a table in any of five different views to help you manage the size and layout of your diagram.
For more information about table views, see Customize the Amount of Information Displayed in Diagrams (Visual Database Tools).
Relationships in a Database Diagram
Within a database diagram, each relationship can appear with three distinct features: endpoints, a line style, and related tables.
Endpoints The endpoints of the line indicate whether the relationship is one-to-one or one-to-many. If a relationship has a key at one endpoint and a figure-eight at the other, it is a one-to-many relationship. If a relationship has a key at each endpoint, it is a one-to-one relationship.
Line Style The line itself (not its endpoints) indicates whether the Database Management System (DBMS) enforces referential integrity for the relationship when new data is added to the foreign-key table. If the line appears solid, the DBMS enforces referential integrity for the relationship when rows are added or modified in the foreign-key table. If the line appears dotted, the DBMS does not enforce referential integrity for the relationship when rows are added or modified in the foreign-key table.
Related Tables The relationship line indicates that a foreign-key relationship exists between one table and another. For a one-to-many relationship, the foreign-key table is the table near the line’s figure-eight symbol. If both endpoints of the line attach to the same table, the relationship is a reflexive relationship. For more information, see Draw Reflexive Relationships (Visual Database Tools).
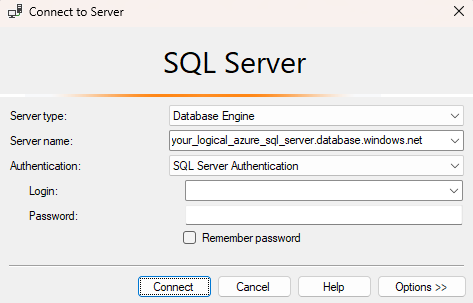
- Select Options in the Connect to server dialog box. In the Connect to database section, enter yourDatabase to connect to this database.
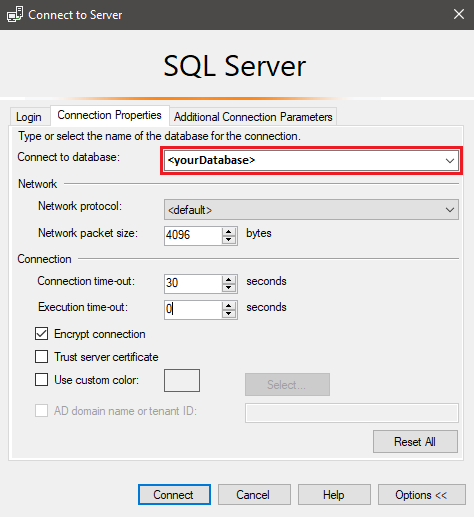
- Select Connect. The Object Explorer window opens in SSMS.
- In Object Explorer, expand Databases and then expand yourDatabase to view the objects in the sample database.
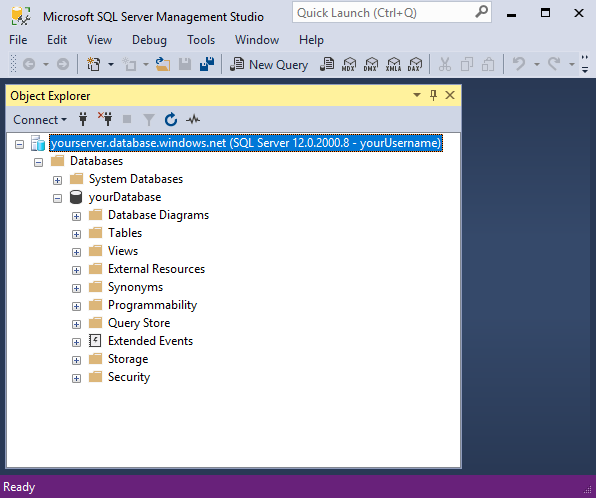
- In Object Explorer, right-click yourDatabase and select New Query. A blank query window opens that is connected to your database.
Create tables in your database
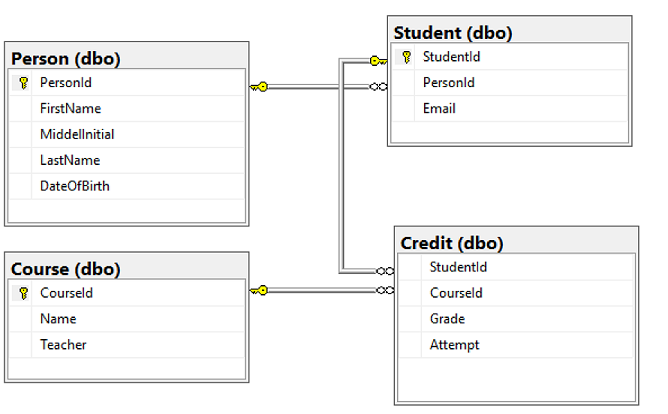
Create four tables that model a student management system for universities using Transact-SQL:
PersonCourseStudentCredit
The following diagram shows how these tables are related to each other. Some of these tables reference columns in other tables. For example, the Student table references the PersonId column of the Person table. Study the diagram to understand how the tables in this tutorial are related to one another. For an in-depth look at how to create effective normalized database tables, see Designing a Normalized Database. For information about choosing data types, see Data types. By default, tables are created in the default dbo schema, meaning the two-part name of a table will be dbo.Person, for example.
Note
You can also use the table designer in SQL Server Management Studio to create and design your tables.
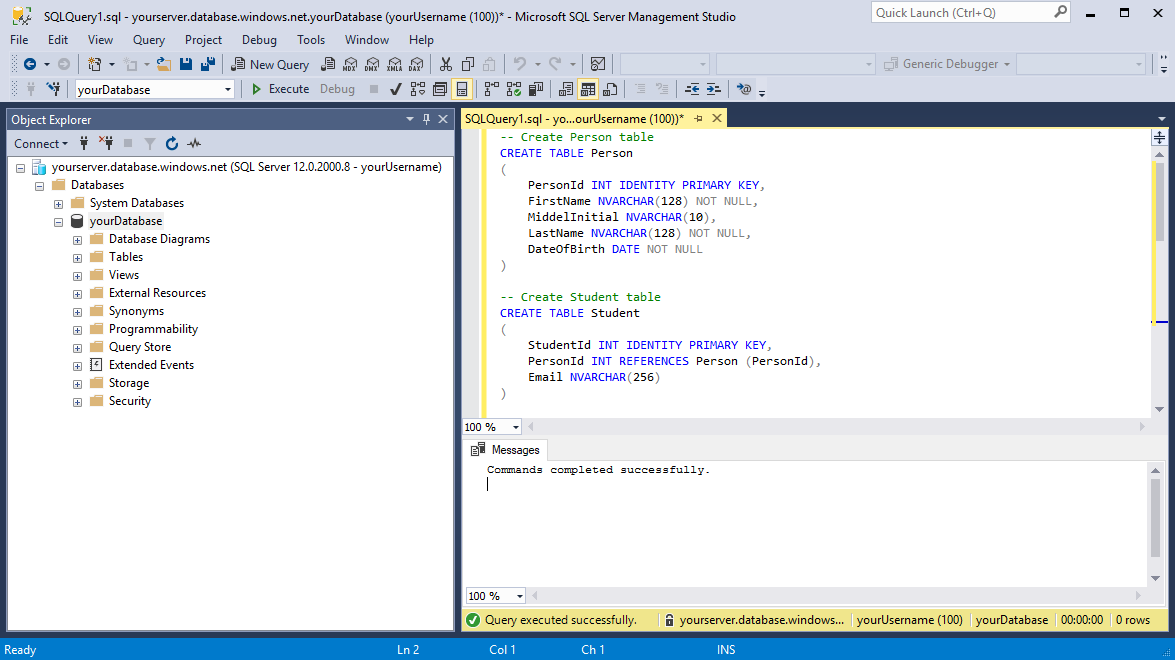
- In the query window, execute the following T-SQL query to create four tables in your database: SQL
--Create Person table- CREATE TABLE Person ( PersonId INT IDENTITY PRIMARY KEY, FirstName NVARCHAR(128) NOT NULL, MiddelInitial NVARCHAR(10), LastName NVARCHAR(128) NOT NULL, DateOfBirth DATE NOT NULL )
- — Create Student table
- CREATE TABLE Student ( StudentId INT IDENTITY PRIMARY KEY, PersonId INT REFERENCES Person (PersonId), Email NVARCHAR(256) )
- — Create Course table
- CREATE TABLE Course ( CourseId INT IDENTITY PRIMARY KEY, Name NVARCHAR(50) NOT NULL, Teacher NVARCHAR(256) NOT NULL )
- — Create Credit table
- CREATE TABLE Credit ( StudentId INT REFERENCES Student (StudentId), CourseId INT REFERENCES Course (CourseId), Grade DECIMAL(5,2) CHECK (Grade <= 100.00), Attempt TINYINT, CONSTRAINT [UQ_studentgrades] UNIQUE CLUSTERED ( StudentId, CourseId, Grade, Attempt ) )
- Expand the Tables node under yourDatabase in the Object Explorer to see the four new tables you created.
Load data into the tables
- Create a folder called sampleData in your local workstation Downloads folder to store sample data for your database. For example,
c:\Users\<your user name>\Downloads. - Right-click the following links and save them into the sampleData folder.
- Open a new Windows command prompt window and navigate to the sampleData folder. For example,
cd c:\Users\<your user name>\Downloads. - Execute the following
bcpcommands to insert sample data into the tables replacing the values for server, database, user, and password with the values for your environment. Windows Command Prompt bcp Course in SampleCourseData -S <server>.database.windows.net -d <database> -U <user> -P <password> -q -c -t "," bcp Person in SamplePersonData -S <server>.database.windows.net -d <database> -U <user> -P <password> -q -c -t "," bcp Student in SampleStudentData -S <server>.database.windows.net -d <database> -U <user> -P <password> -q -c -t "," bcp Credit in SampleCreditData -S <server>.database.windows.net -d <database> -U <user> -P <password> -q -c -t ","
You have now loaded sample data into the tables you created earlier.
Query data
Execute the following T-SQL queries to retrieve information from the database tables.
This first query joins all four tables to find the students taught by ‘Dominick Pope’ who have a grade higher than 75%. In a query window, execute the following T-SQL query:
SQL
-- Find the students taught by Dominick Pope who have a grade higher than 75%
SELECT  person.FirstName, person.LastName, course.Name, credit.Grade
FROM  Person AS person
    INNER JOIN Student AS student ON person.PersonId = student.PersonId
    INNER JOIN Credit AS credit ON student.StudentId = credit.StudentId
    INNER JOIN Course AS course ON credit.CourseId = course.courseId
WHERE course.Teacher = 'Dominick Pope'
    AND Grade > 75;
This query joins all four tables and finds the courses in which ‘Noe Coleman’ has ever enrolled. In a query window, execute the following T-SQL query:
SQL
-- Find all the courses in which Noe Coleman has ever enrolled
SELECT  course.Name, course.Teacher, credit.Grade
FROM  Course AS course
    INNER JOIN Credit AS credit ON credit.CourseId = course.CourseId
    INNER JOIN Student AS student ON student.StudentId = credit.StudentId
    INNER JOIN Person AS person ON person.PersonId = student.PersonId
WHERE person.FirstName = 'Noe'
    AND person.LastName = 'Coleman';
Tip
To learn more about writing SQL queries, visit Tutorial: Write Transact-SQL statements.
Related content
- Tutorial: Design a relational database in Azure SQL Database using Azure Data Studio (ADS)
- Deploy Azure SQL Database for free
- What’s new in Azure SQL Database?
- Configure and manage content reference – Azure SQL Database
- Plan and manage costs for Azure SQL Database
Tip
Ready to start developing an .NET application? This free Learn module shows you how to Develop and configure an ASP.NET application that queries an Azure SQL Database, including the creation of a simple database.
Next step
Advance to the next tutorial to learn about designing a database using Visual Studio and C#.