https://firstcloud.es

Elevating Your Business with Innovative Cloud Solutions

  • Home
  • Our Services
  • Home Lab
  • Nested
  • About Us
  • Contact Us
  • Clock
  • Blog
    • Building Real-World Blockchain Fintech Products
    • Have hands-on experience on a broad range of real-world blockchain and fintech development patterns, including:
    • In-Place Upgrade from Windows Server 2003 to Windows Server 2025 with Active Directory Schema Update
    • In-Place Upgrade from Windows Server 2000 to Windows Server 2003 with Active Directory Schema Update
    • MD102 – Endpoint Administrator Labs
    • Tutorial: Design a relational database in Azure SQL Database C# and ADO.NET
    • Design Database Diagrams (Visual Database Tools)
    • Running stand-alone Nutanix software?
    • Interesting VMware Homelab Kits for 2025
    • Create as relational CMDB in MS SQL for inventory
    • What is Active Directory (Top 50 AD Questions Answered)
    • Memorabilia – Windows 2000

Design Database Diagrams (Visual Database Tools)

05.15.2025 by pablovillaronga //

In this article

  1. Tables and Columns in a Database Diagram
  2. Relationships in a Database Diagram
  3. In this Section
  4. See Also

Applies to: SQL Server Azure SQL Database Azure SQL Managed Instance Analytics Platform System (PDW)

The Database Designer is a visual tool that allows you to design and visualize a database to which you are connected. When designing a database, you can use Database Designer to create, edit, or delete tables, columns, keys, indexes, relationships, and constraints. To visualize a database, you can create one or more diagrams illustrating some or all of the tables, columns, keys, and relationships in it.

Database diagram illustrating table relationships

For any database, you can create as many database diagrams as you like; each database table can appear on any number of diagrams. Thus, you can create different diagrams to visualize different portions of the database, or to accentuate different aspects of the design. For example, you can create a large diagram showing all tables and columns, and you can create a smaller diagram showing all tables without showing the columns.

Each database diagram you create is stored in the associated database.

Tables and Columns in a Database Diagram

Within a database diagram, each table can appear with three distinct features: a title bar, a row selector, and a set of property columns.

Title Bar The title bar shows the name of the table

If you have modified a table and have not yet saved it, an asterisk (*) appears at the end of the table name to indicate unsaved changes. For information about saving modified tables and diagrams, see Work with Database Diagrams (Visual Database Tools)

Row Selector You can click the row selector to select a database column in the table. The row selector displays a key symbol if the column is in the table’s primary key. For information about primary keys, see Working with Keys.

Property Columns The set of property columns is visible only in the certain views of your table. You can view a table in any of five different views to help you manage the size and layout of your diagram.

For more information about table views, see Customize the Amount of Information Displayed in Diagrams (Visual Database Tools).

Relationships in a Database Diagram

Within a database diagram, each relationship can appear with three distinct features: endpoints, a line style, and related tables.

Endpoints The endpoints of the line indicate whether the relationship is one-to-one or one-to-many. If a relationship has a key at one endpoint and a figure-eight at the other, it is a one-to-many relationship. If a relationship has a key at each endpoint, it is a one-to-one relationship.

Line Style The line itself (not its endpoints) indicates whether the Database Management System (DBMS) enforces referential integrity for the relationship when new data is added to the foreign-key table. If the line appears solid, the DBMS enforces referential integrity for the relationship when rows are added or modified in the foreign-key table. If the line appears dotted, the DBMS does not enforce referential integrity for the relationship when rows are added or modified in the foreign-key table.

Related Tables The relationship line indicates that a foreign-key relationship exists between one table and another. For a one-to-many relationship, the foreign-key table is the table near the line’s figure-eight symbol. If both endpoints of the line attach to the same table, the relationship is a reflexive relationship. For more information, see Draw Reflexive Relationships (Visual Database Tools).

  1. Screenshot of the Connect to Server dialog box in SQL Server Management Studio (SSMS).
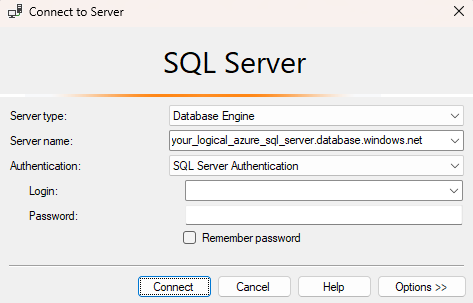
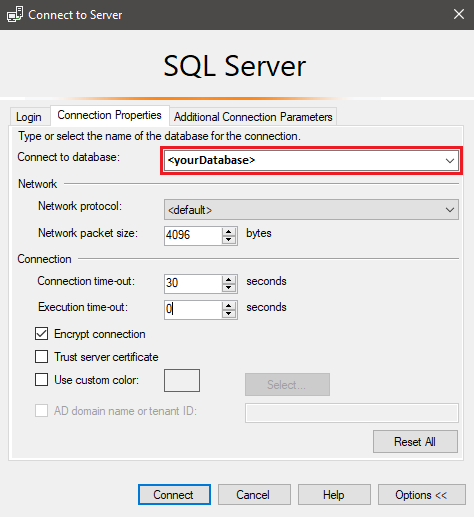
  2. Select Options in the Connect to server dialog box. In the Connect to database section, enter yourDatabase to connect to this database. Screenshot of the options tab of the connect to server dialog box in SQL Server Management Studio (SSMS).
  3. Select Connect. The Object Explorer window opens in SSMS.
  4. In Object Explorer, expand Databases and then expand yourDatabase to view the objects in the sample database. Screenshot of SQL Server Management Studio (SSMS) showing database objects in object explorer.
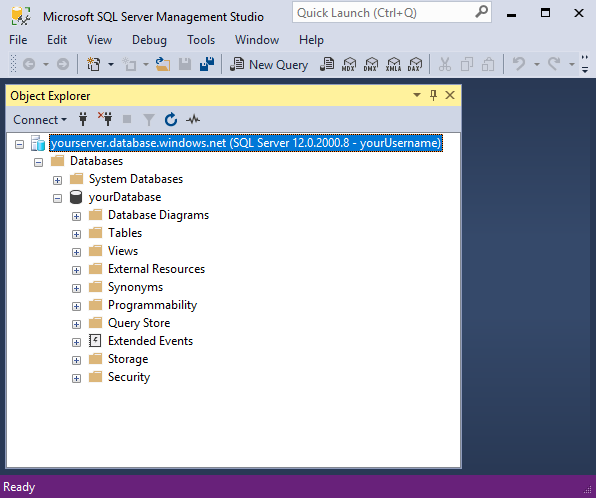
  5. In Object Explorer, right-click yourDatabase and select New Query. A blank query window opens that is connected to your database.

Create tables in your database

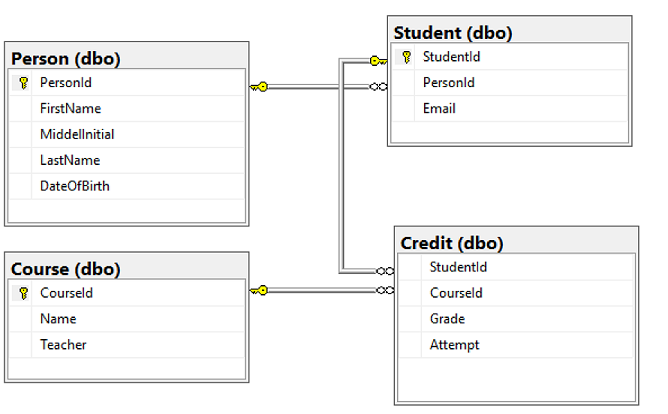
Create four tables that model a student management system for universities using Transact-SQL:

  • Person
  • Course
  • Student
  • Credit

The following diagram shows how these tables are related to each other. Some of these tables reference columns in other tables. For example, the Student table references the PersonId column of the Person table. Study the diagram to understand how the tables in this tutorial are related to one another. For an in-depth look at how to create effective normalized database tables, see Designing a Normalized Database. For information about choosing data types, see Data types. By default, tables are created in the default dbo schema, meaning the two-part name of a table will be dbo.Person, for example.

Note

You can also use the table designer in SQL Server Management Studio to create and design your tables.

Screenshot of the table designer in SQL Server Management Studio (SSMS) showing the table relationships.
  1. In the query window, execute the following T-SQL query to create four tables in your database: SQL
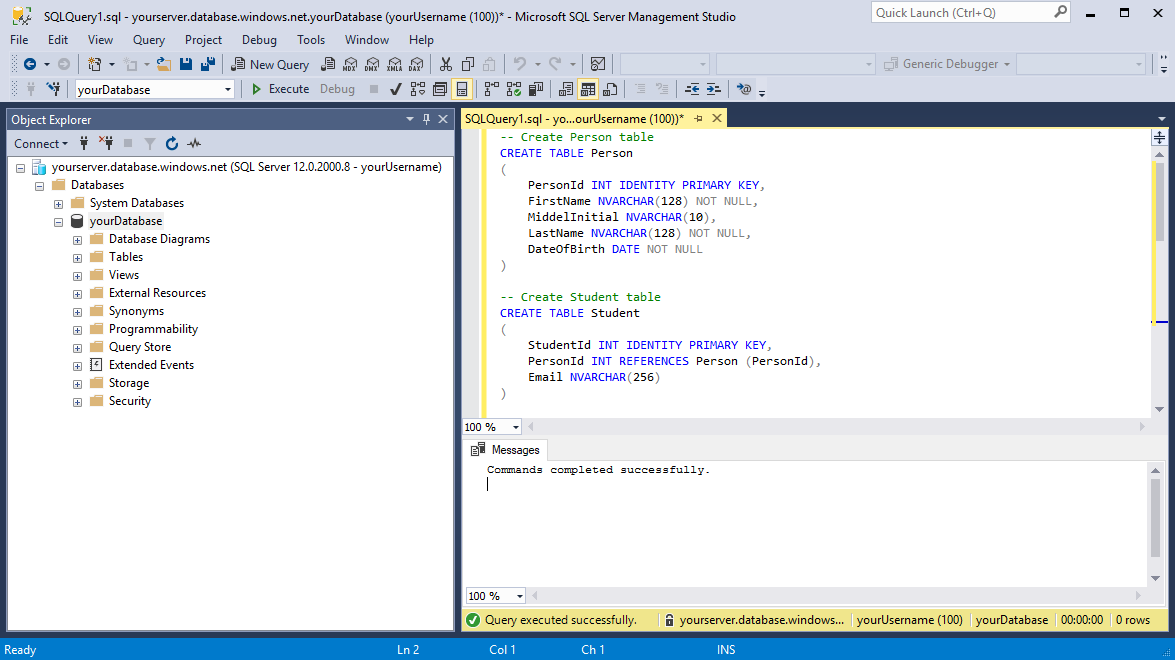
  1. -- Create Person table
  2. CREATE TABLE Person ( PersonId INT IDENTITY PRIMARY KEY, FirstName NVARCHAR(128) NOT NULL, MiddelInitial NVARCHAR(10), LastName NVARCHAR(128) NOT NULL, DateOfBirth DATE NOT NULL )
  3. — Create Student table
  4. CREATE TABLE Student ( StudentId INT IDENTITY PRIMARY KEY, PersonId INT REFERENCES Person (PersonId), Email NVARCHAR(256) )
  5. — Create Course table
  6. CREATE TABLE Course ( CourseId INT IDENTITY PRIMARY KEY, Name NVARCHAR(50) NOT NULL, Teacher NVARCHAR(256) NOT NULL )
  7. — Create Credit table
  8. CREATE TABLE Credit ( StudentId INT REFERENCES Student (StudentId), CourseId INT REFERENCES Course (CourseId), Grade DECIMAL(5,2) CHECK (Grade <= 100.00), Attempt TINYINT, CONSTRAINT [UQ_studentgrades] UNIQUE CLUSTERED ( StudentId, CourseId, Grade, Attempt ) )
  9. Screenshot from SSMS showing the create tables script has been successfully executed.
  10. Expand the Tables node under yourDatabase in the Object Explorer to see the four new tables you created.

Load data into the tables

  1. Create a folder called sampleData in your local workstation Downloads folder to store sample data for your database. For example, c:\Users\<your user name>\Downloads.
  2. Right-click the following links and save them into the sampleData folder.
    • SampleCourseData
    • SamplePersonData
    • SampleStudentData
    • SampleCreditData
  3. Open a new Windows command prompt window and navigate to the sampleData folder. For example, cd c:\Users\<your user name>\Downloads.
  4. Execute the following bcp commands to insert sample data into the tables replacing the values for server, database, user, and password with the values for your environment. Windows Command Prompt
  5. bcp Course in SampleCourseData -S <server>.database.windows.net -d <database> -U <user> -P <password> -q -c -t "," bcp Person in SamplePersonData -S <server>.database.windows.net -d <database> -U <user> -P <password> -q -c -t "," bcp Student in SampleStudentData -S <server>.database.windows.net -d <database> -U <user> -P <password> -q -c -t "," bcp Credit in SampleCreditData -S <server>.database.windows.net -d <database> -U <user> -P <password> -q -c -t ","

You have now loaded sample data into the tables you created earlier.

Query data

Execute the following T-SQL queries to retrieve information from the database tables.

This first query joins all four tables to find the students taught by ‘Dominick Pope’ who have a grade higher than 75%. In a query window, execute the following T-SQL query:

SQL

-- Find the students taught by Dominick Pope who have a grade higher than 75%
SELECT  person.FirstName, person.LastName, course.Name, credit.Grade
FROM  Person AS person
    INNER JOIN Student AS student ON person.PersonId = student.PersonId
    INNER JOIN Credit AS credit ON student.StudentId = credit.StudentId
    INNER JOIN Course AS course ON credit.CourseId = course.courseId
WHERE course.Teacher = 'Dominick Pope'
    AND Grade > 75;

This query joins all four tables and finds the courses in which ‘Noe Coleman’ has ever enrolled. In a query window, execute the following T-SQL query:

SQL

-- Find all the courses in which Noe Coleman has ever enrolled
SELECT  course.Name, course.Teacher, credit.Grade
FROM  Course AS course
    INNER JOIN Credit AS credit ON credit.CourseId = course.CourseId
    INNER JOIN Student AS student ON student.StudentId = credit.StudentId
    INNER JOIN Person AS person ON person.PersonId = student.PersonId
WHERE person.FirstName = 'Noe'
    AND person.LastName = 'Coleman';

Tip

To learn more about writing SQL queries, visit Tutorial: Write Transact-SQL statements.

Related content

  • Tutorial: Design a relational database in Azure SQL Database using Azure Data Studio (ADS)
  • Deploy Azure SQL Database for free
  • What’s new in Azure SQL Database?
  • Configure and manage content reference – Azure SQL Database
  • Plan and manage costs for Azure SQL Database

Tip

Ready to start developing an .NET application? This free Learn module shows you how to Develop and configure an ASP.NET application that queries an Azure SQL Database, including the creation of a simple database.

Next step

Advance to the next tutorial to learn about designing a database using Visual Studio and C#.


Categories // Unix Tags // Unix

Running stand-alone Nutanix software?

05.14.2025 by pablovillaronga //

The serial number can be found in the order fulfillment email you received when you purchased the software.

Nutanix HCI Block – Unboxing To Live In Less Than An Hour

PRISM

https://portal.nutanix.com/page/documents/details?targetId=Acropolis-Upgrade-Guide-v6_5:upg-vm-download-pc-t.html

Extract the Prism Central files from the downloaded compressed file to a folder, directory, or other location, which is accessible when you manually install Prism Central.

Hyper-V. After you extract the ZIP format file, the extracted files are VHDX format files: boot, home, and data virtual disks. For example, for pc.2020.9, the three files are:
    5.18-PrismCentral-boot.vhdx
    5.18-PrismCentral-data.vhdx
    5.18-PrismCentral-home.vhdx
ESX. Not necessary to extract a file. The downloaded file is in OVA format and is ready for use with the associated MD5 checksum.
AHV. After you untar the TAR format file, the extracted files are QCOW format files: boot, home, and data virtual disks. For example, for pc.2020.9, the three files are:
    pc.2020.9-boot.qcow2
    pc.2020.9-data.qcow2
    pc.2020.9-home.qcow2

My Nutanix
Nutanix.com
Support
Pablo

We’ve updated the My Nutanix login process. To learn more about the new login experience, please click here.
1 of 2
kyndryl-pablo.villaronga’s tenant
You haven’t set a default workspace. Choose one here
or dismiss this notice.

This dashboard provides you quick access to all the services and portals available to you.
Some may require a quick activation – click around and dive in!
Promotion
Sales and Partner Services
Expansion Explorer

Auto discover potential tech refresh sales recommendations along with prebuilt Sizer generated solution
Nutanix Sizer

From EUC to Databases, size and get budgetary estimates across on-prem or public cloud deployments.
Collector

Collect, store, view, analyze, and size for an existing customer environment
X-Ray

Benchmark real-world performance, resiliency, and scalability of any HCI and 3-tier platforms
Support and Community
Support & Insights Portal

Open/View Cases, KB, SW downloads, Docs, Installed Base & Licenses
Next

Engage with Nutanix community via Blogs, Activities & Forums
Community Edition

Forum for all things AOS Community Edition
Test Drive

Test Drive Nutanix Products and Features by getting your own free cluster.
Nutanix University

Nutanix education portal for taking courses, certifications and more
Nutanix Connection

Customer advocacy hub where you earn rewards while learning
Cloud Services
Cost Governance
Formerly Beam

Multi-cloud cost governance to optimize spending across public and private clouds
Security Central
Formerly Flow Security Central

Gain complete visibility into the security posture of your multi-cloud environment
Frame

Run full Desktops and Applications in your browser. Learn More
Karbon Platform Services

Build and operate cloud native apps over multi-cloud PaaS
Nutanix DRaaS

Disaster Recovery Service to protect applications running on Nutanix
Nutanix Cloud Clusters (NC2)

Unify private and multiple public clouds for a seamless hybrid multicloud platform
Self-Service
Formerly Calm

Orchestrate applications across multiple clouds to streamline operations and increase agility
Nutanix Data Lens

Visibility and insights to manage and secure your unstructured data.
Nutanix Central
Early Access

Manage your Nutanix Services across Hybrid multi-cloud infrastructure
Administration
Billing Center

Manage subscriptions, view invoices, and update payment methods.
Admin Center

Manage users, configure ADFS, & enable Multi-Factor Authentication.
API Key Management

Create and manage API keys that you use for cloud connections

Consider the following limitations for Prism Central upgrade:

Prism Central 2022.9 and later support maximum 200 clusters. Previous versions of Prism Central supported up to 400 clusters. A pre-upgrade check prevents upgrade attempts for existing deployments supporting more than 200 clusters. Nutanix recommends that you maintain your current Prism Central deployment at version 2022.6.x. For more information, see KB-13272.
Prism Central 2022.9 and later versions are supported only on Prism Central instances hosted on Nutanix AOS clusters running the AHV or ESXi hypervisors. Prism Central instances hosted on Nutanix AOS clusters running Hyper-V or hosted on non-Nutanix infrastructure must not upgrade above 2022.6.x.
If Prism Central is not registered with the AOS cluster hosting it, refer to KB-10596 for additional requirements before upgrading.
Prism Central 2022.9 and later versions no longer support PCDRv1 (CLI-based PCDR). A pre-upgrade check blocks upgrade to Prism Central 2022.9 or later versions if a PCDRv1 setup is detected. Nutanix recommends removing the PCDRv1 configuration before upgrade and enabling PCDRv2 post-upgrade. Refer to KB-13875 and KB 9599 for further details.
A pre-upgrade check blocks upgrade to Prism Central 2022.9 or later versions if a PCDRv2 setup (GUI-based PCDR) is detected. Nutanix recommends removing the PCDRv2 configuration, upgrading to Prism Central 2022.9 or later versions, and then re-configuring PCDRv2 once all requirements are met. Refer to KB 13666 and KB 9599 for further details.
If a single-node Prism Central VM is upgraded to Prism Central 2022.9 or later versions, but the underlying Prism Element (PE) is not running AOS 6.6, a pre-check will prevent the scaling out of Prism Central VM from 1-node to 3-node Prism Central.
Prism Central versions where one-click upgrade is not enabled must use the legacy one-click upgrade method available on Prism Element as the LCM bundle is not available on the portal for download. For more information, see Use Upgrade Software in the Web Console (Legacy 1-Click Upgrade).

Hi, I read the post https://next.nutanix.com/t5/Prism-Central/Download-Prism-Central/m-p/7863#M1

rism Central for Community Edition must be upload to Prism and deployed on your CE/AHV cluster. If you are looking for Prism Central for the production version of AOS, it can be download from the support portal.

df -h

https://portal.nutanix.com/page/documents/details?targetId=Prism-Central-Guide-vpc_2023_3:mul-ova-rename-pc-t.html
https://portal.nutanix.com/page/documents/details?targetId=Prism-Central-Guide-vpc_2023_3:mul-ova-delete-pc-t.html
https://portal.nutanix.com/page/documents/details?targetId=Acropolis-Upgrade-Guide-v6_5:upg-vm-install-wc-t.html

. But after clicking on the download link for ESX, it turns out to download version 4.6 (I think this is an old version).

How can I download Prism Central 5.1 or latest version? Or it is not free for download at all?

Categories // Unix Tags // Unix

Interesting VMware Homelab Kits for 2025

05.14.2025 by pablovillaronga //

Interesting VMware Homelab Kits for 2025

Where did 2024 go!? I can not believe there is only a few more months left before the end of the year!

During VMware Explore US, I had several folks ask whether I was going to publish a 2024 edition of my annual interesting VMware homelab kit blog post, simliar to HERE and HERE for 2023 and 2023 respectively. While I had planned for this originally, I was pretty busy this year and getting hands on with some of the latest Intel 14th Generation systems did not happen until much later and hence why I had not put anything together.

I was recently reminded of this request again and it feels like the right time to summarize the various kits that I have come across and/or have gotten hands on throughout the year.
Homelab Trends

There are also some interesting trends that I have observed in 2024, especially as it pertains to VMware Homelabs/Development/Testing purposes:

The support for non-binary DDR5 SODIMM memory modules has become the new norm and can enable small form factor systems to get up to 96GB of memory
Intel 14th (Consumer) CPU introduces a third core type (LPE) into its Hybrid architecture which has some implications as mentioned in my review of the ASUS NUC 14 Pro as an example
Having more M.2 NVMe or general NVMe slots will be extremely advantageous with the introduction of vSphere NVMe Memory Tiering capability
OCuLink supported peripherals, especially for external GPU and storage is slowly becoming a reality after its initial introduction in 2012 and may finally give Thunderbolt some competition

Aoostar WTR Pro


Aoostar is not a brand that I have worked with personally before, but I have seen some of their kits around. Thanks to colleague Burke Azbill, who was able to confirm with Aoostar that the WTR Pro can run ESXi 8.x without any issues, especially as it contains two Intel multi-gig NIC adaptors. While the WTR Pro primary use case is a Network Attached Storage (NAS) system, because of the plentiful storage, compute & networking, it can also make for an interesting platform to run ESXi, especially for use with vSAN and NVMe Tiering.

CPU: AMD Ryzen 7
Memory: 64GB (DDR4)
Storage: 2 x M.2 NVMe (2280) & 4 x SATA (3.5″)
Network: 2 x 2.5GbE (i226)
Dimensions: 228mm x 150mm x 185 mm
Website: https://aoostar.com/products/aoostar-wtr-pro-4-bay-90t-storage-amd-ryzen-7-5825u-nas-mini-pc-support-2-5-3-5-hdd-%E5%A4%8D%E5%88%B6


ASUS NUC 14 Pro


The ASUS NUC 14 Pro is the first official NUC that has been released under ASUS after acquiring the Intel NUC business last year. The classic 4×4 kit continues to be a community favorite due to its small form factor and supporting up to 96GB of memory, you can certainly do quite a bit. For a complete review of using the ASUS NUC 14 Pro with ESXi, check out my write-up HERE.

CPU: Intel 14th Gen
Memory: 96GB (DDR5)
Storage: 2 x M.2 NVMe (2280) & 1 x SATA
Network: 1 x 2.5GbE (i226)
Dimensions: 120mm x 130mm x 58 mm
Website: https://www.asus.com/us/displays-desktops/nucs/nuc-mini-pcs/asus-nuc-14-pro/

ASUS NUC 14 Performance


If you are looking for a more powerful ASUS NUC, especially with more graphics capabilities, the NUC 14 Performance might be of interests and can also go up to 96GB of memory and support up to 3 x M.2 NVMe, perfect for running ESXi as well as taking advantage of the new NVMe Memory Tiering capability.For a complete review of using the ASUS NUC 14 Performance with ESXi, check out my write-up HERE.

CPU: Intel 14th Gen
Memory: 96GB (DDR5)
Storage: 3 x M.2 NVMe (2280)
Network: 1 x 2.5GbE (i226)
Dimensions: 120mm x 130mm x 58 mm
Website: https://www.asus.com/us/displays-desktops/nucs/nuc-kits/asus-nuc-14-performance/

ASUS PN65


Similiar to the ASUS PN64-E1, which I am a HUGE fan of (see my review HERE), the ASUS PN65 is an updated version with support for the latest Intel 14th Generation CPUs. The only big difference that I could find between the PN65 and PN64-E1 is the lack of support for a dTPM add-on, which made the ASUS PN64-E1 really standout for a 4×4 form factor. If you do require a compatible TPM with ESXi, the PN64-E1 is still a viable and recommended system.

CPU: Intel 14th Gen
Memory: 96GB (DDR5)
Storage: 2 x M.2 NVMe (2280) & 1 x SATA
Network: 1 x 2.5GbE (i226)
Dimensions: 120mm x 130mm x 58 mm
Website: https://www.asus.com/us/displays-desktops/mini-pcs/pn-series/asus-expertcenter-pn65/

GMKtec NucBox M7

GMKtec is another player in the 4×4 small form factor kits and while I have not had any personal hands on experience, I came to learn about the NucBox M7 from a fellow VMware colleague who had success running ESXi. The NucBox M7 is interesting for a few reasons, not only is it an AMD kit but it also uses Intel-based NICs, which is why it works with ESXi compared to most AMD-based kits which prefers Realtek-based NICs which ESXi drivers do not exists. Support for multiple NVMe slots and network interfaces, makes this a very nice kit without having to deal with the Intel Hybrid CPU architecture and what stands out on the NucBox M7 is the inclusion of an OCuLink port.

Similiar to Thunderbolt, the OCuLink interface allows users to add additional capabilities, initially the use case for OCuLink is to add external graphics and there are a few OCuLink eGPU chassis from the AOOSTAR AG01 to the Minisforum DEG1. While OCuLink accessories is mostly focused on adding eGPU capabilities, I was able to find some M.2 expansion chassis using OCuLink such as NFHK Oculink M.2 (1 x NVMe) and AOOSTAR TB4S-OC (4 x NVMe) that is fairly inexpensive when compared to a Thunderbolt-based chassis, a nice benefit with a new competitor in this space.

CPU: AMD Ryzen 7
Memory: 96GB (DDR5)
Storage: 2 x M.2 NVMe (2280)
Network: 2 x 2.5GbE (i226)
Dimensions: 127mm x 132.08mm x 58.42 mm
Website: https://www.gmktec.com/products/amd-ryzen-7-pro-6850h-mini-pc-nucbox-m7

Lenovo ThinkCentre Neo Ultra

The ThinkCentre Neo Ultra is a new form factor from Lenovo and gives off a strong Apple Mac Studio vibe. In addition to supporting the latest Intel 14th Generation CPU and potentially up to 96GB (officially it only lists 64GB DDR5), the larger form factor of the Lenovo ThinkCentre Neo Ultra embeds an NVIDIA GeForce RTX 4060 and can also be configured with an additional Discrete NPU (Neural Processing Unit) accelerator based on Kinara Ara-2. I recently wrote about using the Lunar Lake Intel NPU with ESXi for workload acceleration, the additional NPU option with the GPU could be an interesting capability for those looking to play with AL/ML workloads.

CPU: Intel 14th Gen
Memory: 64GB (DDR5)
Storage: 2 x M.2 NVMe (2280)
Network: 1 x 1GbE (i219)
Dimensions: 107mm x 195mm x 196mm
Website: https://www.lenovo.com/us/en/p/desktops/thinkcentre/thinkcentre-neo-series/lenovo-thinkcentre-neo-ultra-intel-usff/12w1cto1wwus1

Lenovo P3 Tiny


The Lenovo P3 Tiny is a kit that I have reviewed before (see HERE) and it is great to see Lenovo updating this kit to support the latest Intel 14th Generation CPUs. I also like the configurations options that P3 Tiny provides which includes adding additional networking options (see website below for details) or adding an NVIDIA T400 (4GB), T1000 or T1000 (8GB) for more graphics capabilities that can be used variety of different workloads.

CPU: Intel 14th Gen
Memory: 96GB (DDR5)
Storage: 2 x M.2 NVMe (2280) & 1 x SATA
Network: 1 x 1GbE (i219)
Dimensions: 179mm x 182.9mm x 37mm
Website: https://psref.lenovo.com/Product/ThinkStation/ThinkStation_P3_Tiny

Minisforum MS-01 or SimplyNUC Onyx


Minisforum has really made a name for itself in recent years, introducing a number of interesting and unique small form factor systems. The MS-01 really stood out to me as it checks off many of the boxes for an ideal ESXi homelab setup from supporting multiple NVMe slots to having both 2.5GbE & 10GbE (SPF+) connectivity. While I would love to more hands on with Minisforum portofolio from a VMware perspective, thanks to a fellow colleague, I did get a chance to play with the MS-01, which you can read the full review HERE.

CPU: Intel 13th Gen
Memory: 96GB (DDR5)
Storage: 3 x M.2 NVMe (2280) OR 2 M.2 NVMe (2280) and 1 x U.2 SSD
Network: 2 x 2.5GbE (i226) & 2 x 10GbE SFP+ (X710)
Dimensions: 196mm × 189mm × 48mm
Website: https://store.minisforum.com/products/minisforum-ms-01 or https://simplynuc.com/product/nuc24oxgv9/

Protectli Vault Pro 6650/6670


The Vault Pro 6650/6670 is another interesting kit that I came to across from the VMware Community and is an excellent system for those needing a bunch of network interfaces that includes 4 x 2.5GbE and 2 x 10GbE SFP+ ports. The fanless design of the Vault Pro 6650/6670 also means you will have both a capable and quiet system, which is not always the case with the amount of capabilities this system includes. I did a full review of the Vault Pro 6650/6670 earlier this year, which you can read more about HERE.

CPU: Intel 12th Gen
Memory: 96GB (DDR5)
Storage: 1 x M.2 NVMe (2280) & 2 x SATA
Network: 4 x 2.5GbE (i226) & 2 x 10GbE SFP+ (X710-BM2)
Dimensions: 191mm x 178mm x 76mm
Website: https://protectli.com/vault-6-port

SimplyNUC extremeEDGE 3000


The extremeEDGE 3000 from SimplyNUC is the third generation of their Edge-focused product line and packs some really useful capabilities across compute, storage and networking as you can see from the stats below. I was pretty impressed with their latest extremeEDGE 3000, which I had the opportunity to get hands on with and you can read the full review HERE. Whether you have an Edge use case or want something that is compact and quiet, the extremeEDGE is a great choice and provides AMD-based CPU for those looking for more compute options.

CPU: AMD Ryzen
Memory: 96GB (DDR5)
Storage: 3 x M.2 NVMe (2280) & 1 x M.2 NVMe (2242)
Network: 4 x 2.5GbE (i226)
Dimensions: 163 mm x 149 mm x 72.94 mm
Website: https://www.simplynuc.media/wp-content/uploads/2024/06/NUC_134_BMC-enabled-3000-Series-Spec-Sheets.pdf

Vecow TGS-1500


The last time I saw a modular and stackable system was from Hivecell back in 2019, so it was refreshing to learn about the flexible TGS-1500 platform from Vecow. The base configuration of the TGS-1500 includes all the latest compute, storage and networking capabilities that you would expect in 2024 and with their modular design, you can add additional I/O or AI Accelerator using their compact MXM form factor.

You can tell that the TGS-1500 is aimed at supporting graphics intensive and/or AI/ML workloads with the list of supported AI accelerators: NVIDIA RTX A2000 Ada, NVIDIA RTX A2000, NVIDIA Quadro T1000, NVIDIA Quadro RTX 3000, NVIDIA Quadro RTX 5000, NVIDIA Quadro RTX A3500 Ada, NVIDIA Quadro RTX 5000 Ada or Intel Arc A370M. Per NVIDIA vGPU documentation, it looks like both the NVIDIA Quadro RTX 5000 & Quadro RTX 5000 Ada can support vGPU, so that would be another added bonus for those interested in playing with Private AI Foundation for NVIDIA (PAIF-N).

CPU: Intel 14th Gen
Memory: 96GB (DDR5)
Storage: 1 x M.2 NVMe (2280) & 1 x M.2 NVMe (2242)
Network: 1 x 2.5GbE (i226)
Dimensions: 117mm x 120mm x 88.3mm
Website: https://www.vecow.com/dispPageBox/vecow/VecowCT.aspx?ddsPageID=PRODUCTDTL_EN&dbid=5975100935

More from my site

Updated Dashboard for VMware Community Homelabs using Dashimo
Slick Jonsbo D31 computer case with embedded LCD screen for homelab
ESXi on Protectli Vault Pro 6650/6670
ESXi on Minisforum MS-01
VMware Cloud Foundation 5.0 running on Intel NUC

Categories // ESXi, Home Lab Tags // homelab

Categories // Unix Tags // Unix

  • « Previous Page
  • 1
  • 2
  • 3
  • 4
  • Next Page »

ads

SPONSORED
FirstCloud.es

Blockchain Solutions for Startups

Launch your payment gateway 90% cheaper than traditional providers. Backed by Polygon and Ethereum.

Get Free Consultation →
No credit card required • Cancel anytime

Search

Copyright © 2025 · Modern Studio Pro on Genesis Framework · WordPress · Log in